Overblog
Follow this blog Administration + Create my blog
July 25 2012 3 25 /07 /July /2012 10:33
Set up an automatic process to convert images to a different format

Picture files come in all sorts of formats such as JPEG and TIFF. Each has its own individual strengths, but it’s common to need to change the format of one or more images. For example, you might need to convert a sizable TIFF file into a smaller JPEG to email it to someone. Doing this manually -- even for a single file -- takes time, so we’re going to show you how to set up an automated process for converting one or more image files from one format to another. The input files can be in BMP, GIF, JPEG, PDF, PICT, PNG or TIFF format. All you’ll need to do is drop the files’ icons onto an app in your Mac’s Dock and they’ll be converted to the format you’ve specified.

To do this, we’ll be using an app called Automator, which resides in your Applications folder. We’ll show you the basics of how to use it, so that you can go on to create your own processes to help you work faster and smarter.

Before we get stuck in, let’s explain what the process we’re about to create will do. It will appear as an application on your Mac, just like Mail, Safari or Pages. When you drag and drop image files onto the app’s icon, the files will be copied to a new folder on your desktop (so that the originals remain untouched). These images will then be converted into the format of your choice.

If this doesn’t sound exactly the way you want your process to work (you may, for example, want the new folder to be created elsewhere) then there are plenty of options you can tweak to make the process do exactly what you want.

Once you’ve seen what Automator is capable of and how easy it is to create your own processes, you can start getting creative with it. This will enable you to work more quickly with your Mac, automating the mundane tasks, so you can get on with the fun, creative stuff.

Be aware, though, that Automator is quite an advanced app, and doesn’t always hold your hand if things go wrong or your process fails to complete successfully. You can click View > Log to see what’s happened, but the results aren’t always particularly helpful, meaning you may need to undertake a bit of trial and error to get things right.

What You’ll Need:

>> OS X
>> some images to convert

1. Create an app

Open up Automator from your Applications folder or Launchpad. First off, you’ll be asked what kind of document you’d like to create. Click Application, then click the Choose button. You’ll now see the main Automator window, as shown on the left.

2. Create folder

In the left-column, click Files & Folders, then find New Folder in the second column. Drag this to the top-right pane. In the text field next to Name, type ‘Conversion’ followed by a space. Then click the Variables button, followed by the Date & Time category in the left column.

3. Time and date

Drag "Current time" to the text field where you typed "Conversion". It appears as a lozenge. Now drag "Today’s date" from the right column to the text field. Click in the text field and use the “ and ‘ keys to move around and insert a space between the two lozenges.

4. Change the format

Double-click the "Today’s date" lozenge and change the Format drop-down to one that does not contain a "/" symbol. Then click Done. Finder actually interprets the "/" in the date as being the next level in the folder hierarchy, which will cause your process to fail.

5. Get Folder Contents

Leave 'Where' set to "Desktop". Now click Actions > Files & Folders and drag "Get Folder Contents" to the area below your 'New Folder Action' in the Process area. This picks up the contents of the folder ready for the next step where we convert the image format.

6. Change image format

Click Actions > Photos and drag "Change Type of Images" beneath "Get Folder Contents". In the pop-up, click Don’t Add, because the files have been duplicated by the New Folder Action. Use the "To Type" drop-down to pick your output format. In our case, we’ve gone for JPEG.

7. Save your process

Now click the File menu and choose Save…. Give your process a name, such as "Convert to JPEG" -- if necessary, click the arrow next to the text field, and browse to your Applications folder. Click Save. Now locate your app and drag its icon to your Dock.

8. Try it out

Find an image file that isn’t a JPEG, and drag it onto the "Convert to JPEG" icon in the Dock. When the app icon goes dark, let go of your mouse or trackpad button, and the images are converted and placed in a new folder on your desktop. The original(s) will be untouched.

Source from: http://www.maclife.com/article/howtos/how_batch_convert_images_your_mac_without_photoshop

Related Tips:

How to Batch Convert Video Files on Mac

How to Batch Convert iTunes Movies on Mac


Share this post
Repost0
July 24 2012 2 24 /07 /July /2012 07:56

Remember when you headed to the neighborhood video store to rent movies? Remember VHS tapes? Remember standing in line?

Thankfully, those days are gone, completely replaced by the DVD generation, which is quickly being replaced by streaming movies and TV shows from the internet. If you’re still into DVDs, here’s a way to rip them to your Mac and six ways you’ll love doing it.

Rip. Mix. Burn. Without The Burn

In the early days of the iMac, Apple promoted Rip. Mix. Burn. and launched iTunes so we could all take our music CDs and copy them to the Mac. You know, for backup and safekeeping.

Then along came the iPod and we digitized entire CD libraries and used the iPod to play music. The CD became the backup.

DVDs may disappear from the shelves one day in the future, but for now, DVDs remain a good source of home movie viewing. Who among us doesn’t have a collection of DVD movies and TV shows?

It’s time to rip those DVDs to your Mac. You know, for backup and safekeeping. That’s what DVDRipper Pro does. This handy little app can change how you view and use DVD movies.

Protect DVDs: By ripping your DVD movies and TV shows to your Mac, DVDRipper Pro acts as a backup creation tool. The DVD becomes the backup, and you can watch the DVD on your Mac and avoid loss or scratches to the DVD.

Time Shifting: Who doesn’t like time shifting. That’s what makes DVRs so popular. What not do the same with your DVD rentals. Instead of rushing to get them back to the store within a day or so, rip them to your Mac, view them when you want. Win. Win.

Save Battery Life: Most Mac users are MacBook owners, and that means battery life is a premium. Running a DVD in the Mac notebook uses much more battery power than the ripped movie, so your Mac’s battery lasts longer while you view movies.

Manage DVD Collection Digitally: Forget worrying about organizing a bookshelf wall of DVDs. Copy them to your Mac as a backup and manage the entire collection (or, whatever you want to watch), right from your Mac. Label, move, group the movies just like a bunch of Mac files.

Import To iTunes: Wait. We don’t want to lug the Mac everywhere just to watch a movie. Doesn’t the iPad and iPhone work for movies. Yep. Rip a DVD to your Mac, import it into iTunes, and make it ready to sync up with your iPad or iPhone or run on your big screen TV using Apple TV.

Mac DVDRipper Pro runs on Mac OS X Lion and Mountain Lion. The only real negative is that not all DVDs will rip (haven’t found a movie that doesn’t– yet), and each movie takes awhile to rip to your Mac (depends on the Mac), so find some chores to do while the ripping takes place.

Using DVDRipper Pro is as easy as selecting a ripping mode, then stuffing a DVD into your Mac, and then click Rip. The rest is just waiting.

Mac DVDRipper Pro

Source: http://mac360.com/2012/07/ways-youll-love-the-app-that-rips-dvds-to-your-mac/

Related Articles:

1. How to Rip DVD to Samsung Galaxy S3 on Mac

2. How to Rip DVD Soundtrack to iPod on Mac

Remove DRM from iTunes Movies and Music Files?

Do you have iTunes music songs with DRM protection? Here you can refer to: Tune4mac M4P Converter to remove DRM from iTunes M4P files on Mac. And Tune4mac iTunes Video Converter Platinum to convert DRM protected iTunes movie purchases and rentals.


Share this post
Repost0
July 23 2012 1 23 /07 /July /2012 07:31

Learning to play an instrument can be pretty hard, but it’s never too late to get started. At these times, the best way to keep going is to facilitate those engagements; make them accessible and fun. One way to do that is to make use of modern technology.musician apps for ipad

In this article, we’ll be looking at iPad applications that are aimed at starting musicians, or can be used by people who want to brush up on their guitar-playing skills from high school.

Mind you, these apps won’t show you how to learn the instrument, but provide nifty tools that will prove to be incredibly useful to many amateur musicians.

Notable

If you want to be more than a one-trick musical pony, memorizing individual songs from YouTube, you’ll have to be able to easily read sheet music. After learning the basic notes and chords, the only thing that will make you more fluent is practice; lots of practice.

musician apps for ipad

That’s where Notable comes in. This beautifully designed iPad app quizzes you about individual notes and chords, sharps and flats, mixing different keys depending on the difficulty setting and chosen exercise categories. Keep a close eye on the timer, and try not to linger on any one question too long. If you’re feeling particularly skilled, you can enable the ‘insane mode’ in the preferences. This makes Notable stop drawing the notes, so you can practice pitch recognition by ear.

Yamaha NoteStar

Having tried most, if not all of the sheet music applications in the App Store, I’ve come to the conclusion that there are two distinct categories. The kind that allows you to read your own PDF sheet music in an over-glorified PDF reader, and the kind with an in-app sheet music store.

To carry your own PDF sheet music library on the go, I’d suggest you to keep using iBooks, the default iPad PDF reader. However, if your instrument of choice is a keyboard or piano, I urge you to take a look at Yamaha NoteStar.

musician apps

Yamaha NoteStar is a very slick and intuitive musician app for iPad, with an in-app store for cheat music. The cheat music is not cheap, but you can sample (generally the first two pages) of every song. Each of these songs also comes with complete vocals and percussion when applicable, which you can turn on or off. It’s also really easy to change the tempo of the song, or play a transposition of the song; that is, play it in a different key.

n-Track Tuner

Even when you’re still getting the hang of your instrument, it’s important to keep it in tune. For a piano, this might be easier said than done, but most string instruments should be tuned regularly. You can do this by ear, using a special tuning device, but also using your iPad.

Having your iPad around can be really useful to quickly tune an instrument, but you should consider buying a “real” tuner. It will only cost a few bucks, and is likely more accurate than the built-in microphone of your iPad.

musician apps for ipad

n-Track Tuner is very easy to use. Play a long note on your instrument, and the app will tell you what it picked up. Seeing an F-sharp when expecting a G? You’ll have to higher the pitch. At the bottom of the screen, the green bar will show you when the observed note is higher in pitch than the one displayed on the screen, and the red bar indicates when a note is lower than the one displayed.

Considering the size of the App Store, and the number of musician apps for iPad in it, this article is hardly a complete source. Do you know any other iPad apps? Voice your suggestions in the comments below the article!

Source: http://www.makeuseof.com/tag/3-free-ipad-apps-starting-musicians/

Continue Reading...

How to Convert Video to MP3 on Mac

How to Rip DVD Soundtrack to iPod

Share this post
Repost0
July 19 2012 4 19 /07 /July /2012 04:18

OS X Mountain Lion

Apple issued a third preview of OS X Mountain Lion this week, bringing the operating system formerly known as Mac OS X 10.8 another step closer to landing on our own systems. Eager to install it as soon as it’s released? Here are a few steps you can take to prepare for the next big cat to come down off the mountain later this summer.

OS X Mountain Lion will be roaring onto Macs this summer, bringing a bevy of new iPad-inspired features and building upon the work already done with Mac OS X Snow Leopard 10.6 and OS X Lion 10.7 before it. While developers are currently behind closed doors playing with the preview build, the rest of us have to be content to sit on the sidelines and wait -- or do we?

Here are a handful of things users can do to prepare for the arrival of OS X Mountain Lion -- instead of continually refreshing the Updates button in the Mac App Store, that is.


Messages beta

Test Drive the Messages Beta

There’s actually one component of OS X Mountain Lion that is available to current OS X Lion users: A free beta of the new Messages app, which replaces the former iChat and introduces unlimited messaging between the Mac and iOS devices. You’ll need Mac OS X 10.7.3 (the latest version publicly available) to install Messages, so be sure to hit Software Update and get current before downloading.

In addition to iMessages between iOS devices and the ability to send photos, videos, attachments, contacts, locations and more, users can also initiate a FaceTime call from the Messages beta, as well as communicate through the more traditional AIM, Yahoo!, Google Talk and Jabber platforms as well.

Keep in mind there’s no easy way to return to iChat once you’ve installed Messages -- but given that OS X Mountain Lion will ultimately wind up replacing it anyway, there’s no reason why you should worry about that.


OS X Mountain Lion new features

Bone Up on New Features

Apple has posted a rare sneak peek into what’s coming with OS X Mountain Lion, but with the annual Worldwide Developers Conference (WWDC) kicking off on June 11 in San Francisco, you can bet there will be some last-minute additions that developers haven’t had access to before now.

Presumably, developers will be receiving a close to final version of Mountain Lion at this year’s WWDC, and even though they shouldn’t be disclosing any of the new stuff that Apple doesn’t publicly announce themselves, things have a way of finding their way onto the internet.

For example, this week’s OS X Mountain Lion Developer Preview 3 build has introduced a new “Do Not Disturb” setting to Notifications Center, allowing Mac users to hide alerts and banners when they want to stay focused on the task in front of them. There will certainly be more such discoveries yet to come, so it’s good to stay current when new builds reach developers, so you’ll know what to expect when OS X Mountain Lion comes to visit your Mac this summer.


Snow Leopard is on the way

Get Current

If you’re still lounging about on Mac OS X Snow Leopard -- either from laziness or maybe you simply didn’t like the changes introduced with OS X Lion -- the clock is ticking for you to make your peace with Mac OS X 10.7 and bite the bullet. While Apple hasn’t expressly stated so yet, you’ll likely need OS X Lion installed first before you make the trek to see the lion up on the mountain.

Should you still be hanging fast and loose with Mac OS X Leopard 10.5, you’ll have even more work ahead of you -- especially if you’re a MobileMe subscriber. That service is folding up on June 30, 2012, which means you’ll be forced to transition over to iCloud in less than 60 days, whether you like it or not. Thankfully, Apple is easing the transition by offering a free installer DVD for Snow Leopard 10.6 to MobileMe members just by asking -- after installing, you can then purchase OS X Lion from the Mac App Store and be ready and waiting for Mountain Lion’s arrival.

For existing OS X Lion users, the task is much simpler: Just run Software Update to make sure you’re at the latest version, currently 10.7.3. (Developers are currently playing with a 10.7.4 beta that seems to be fairly complete, so a newer version could be available soon as well.)


AppTrap move files prompt

Clean Up Your System

Now that Apple plans to step up major Mac OS X releases on an annual basis to keep parity with iOS, it’s more important than ever to keep your Mac tidy and take care of any problems before it comes time to install a new operating system version.

The first step we recommend: Take inventory of your Applications folder and chuck anything that hasn’t been used in a while. The free App Trap System Preferences pane helps greatly with this task, digging up related files from your Preferences folder and offering to trash them at the same time as the app you’ve just moved to the Trash. While AppTrap has proven flawless in our use, be sure to double-check before committing to a deletion, just in case it’s matched the wrong app to the wrong preference file(s).

While OS X Mountain Lion should install just fine over your existing software, it’s never a bad idea to spend some of your time archiving files that are no longer needed, perhaps to an external hard drive or other media, and then deleting them from your system drive. While OS X Lion installed just fine for most Mac App Store customers, there were early reports of problems that required wiping a hard drive and starting from scratch, so it’s better to have fewer files on your system drive should the worst occur.


Time Machine

Back That Stuff Up!

We really shouldn’t have to write these words again, but it seems some of us just never seem to let them truly sink in: Back that stuff up! The transition to OS X Mountain Lion should be pretty seamless -- buy it from the Mac App Store and wait a bit as it installs -- but things can and frequently do go awry, so your best defense is a good offense.

Mac OS X’s built-in Time Machine is the bare minimum level of backup you should be investing in, which requires nothing more than an external hard drive (or network-attached storage) at least equal in size to your internal hard drive or SSD -- and preferably twice as big, or more, to accommodate incremental backups over time.

While we recommend manually initiating a Time Machine backup right before purchasing OS X Mountain Lion from the Mac App Store later this summer (select “Back Up Now” from the menu bar), it’s a good idea to create a separate, one-time backup using a tool such as Carbon Copy Cloner on a fresh external disk the night before. As the old saying goes, “Better safe than sorry…”

Source: http://www.maclife.com/article/features/5_ways_prepare_os_x_mountain_lion

What's Related:

How to Convert Any Videos on Mac Mountain Lion?


Share this post
Repost0
July 18 2012 3 18 /07 /July /2012 04:09


audiobook

Most people like to listen to audio books while walking, driving or resting. How many of you have encountered with this situation below?

Got audiobook from Audible.com or iTunes, but unable to play the audio books on your Android devices, like Samsung Galaxy Tab, HTC smartphone, Motorola Xoom, etc.


drmWhy Does It Happen?

Actually, audiobook on Audible.com and iTunes Store is in .aa or .m4b format which is protected by DRM (Digital Rights Management) policy. That means they are limited to play on specific devices which are compatible with .aa or .m4b formats. Apparently, Android devices don’t support protected .aa and .m4b audiobook files, but only .mp3, .aac, .wave, etc.

What to Do with It?

In this case, the most direct and easiest way is to find an audiobook converter which can remove DRM protection from those locked .aa and .m4b audio books and convert them into .mp3, .aac, or .wav.

Top-leading Audiobook Converter for Mac and Windows

If you Google audiobook converter, you will find numerous similar programs. It's too hard to figure out which one is better. Here we just make it easy for you.

audiobookFor Mac: Tune4mac iTunes Audio Converter

It can remove DRM restriction from protected .m4b and .aa audiobooks from Audible.com and iTunes easily. It converts .m4b and .aa to .mp3, .aac and .wav compatible with Android devices on Mac Lion and iTunes 10.5 or lower with high speed.

windows iconFor Windows: Noteburner Audio Converter

It also removes DRM from protected .m4b and .aa and convert the audio books to .mp3, .aac, .ogg and .wav on Windows XP, Vista and Win 7 with CD-quality.

Tips: You may simply download the trial version of those two audiobook converter to see whether they meet your needs or not:

download icon Free download Tune4mac iTunes Audio Converter

download icon Free download Noteburner Audio Converter


Continue reading...

How to Convert M4B and AA to MP3


Share this post
Repost0
July 17 2012 2 17 /07 /July /2012 05:41


youtube video editorA while back, Matt wrote an article about the 2010 YouTube Video Editor, and although it doesn’t seem that long ago, a lot has changed. Back then, it had a few basic features, but in all honesty, it just wasn’t really that functional. However, two years later, it’s high time to revisit the video web app. Everyone deserves a second chance, right?

First off, I’ll say this – the YouTube video editor is functional….to an extent. As with anything, there are different aspects when it comes to hitting a target audience, so let’s just say you won’t be cutting the next Academy Award winner (or maybe you’re one of those avant-garde artists who will use nothing but an iPhone and the YouTube Video Editor to create the most revolutionary work ever made). However, the app is definitely worth checking out regardless of whether you plan on using it regularly or not.

The Editor

Back when we first took a look at the YouTube Video Editor, we saw that it included some standard functions: cropping video, video splicing (a must), and Audioswap. However, the new video editor does a little bit more, but before I begin, I just want to just mention that splicing is about the only thing that is the same. Realistically, you can’t change that much.


youtube video editor

With the editor, you can put any clips you have uploaded into one big video. This is ideal for family vacation videos taken with iPhones. If you are already uploading goofy little clips of your family online, why not put them in one home movie? Seems reasonable to me. Additionally, there is a Creative Commons video library so that you can insert stock footage into your own videos. I’m not entirely sure what you would use this for, but I’m sure you could make some nifty stuff with it.


Other stuff that you can use (that would be found on any standard movie editor) include actual titles and some (corny) transitions. Furthermore, the Audioswap song selection is still around, but it looks a lot more user-friendly.

The Enhancements

What was lacking with the earlier version of the YouTube Video Editor were Enhancements. Although not actually part of the editor, the Enhancement section of YouTube provides several ways to alter the look of your video or adjust the audio. Although they aren’t the most professional tools, they are still pretty great for what they are.

youtube editor

The Enhancement section can be found in the video manager section of your channel through any of your videos, and its content is divided into three categories: quick fix, effects, and audio.  The quick fix includes basic adjustments for issues such as contrast and even saturation.  As for the effects, there are many different methods of color grading available. Also, the audio is pretty much the same as the one you would find in the editor.

youtube editor

All in all, the one thing that really stands out with me concerning these Enhancements is the implementations of a video stabilizer. As you may know, a lot of the video content on YouTube is shot on tiny, handheld, shaky smartphones.  With the stabilizer, there is actually a chance of getting some smooth video. Just pop your shaky video into the stabilizer, and YouTube should do the rest.

youtube video editor

Source: http://www.makeuseof.com/tag/functional-current-youtube-video-editor/

Continue reading...

How to Download YouTube Video on Mac

How to Import YouTube Video to iMovie


Share this post
Repost0
July 17 2012 2 17 /07 /July /2012 05:09


Mac OS X Disk Utility Icon

Want to do a clean system install of Mac OS X on your shiny new Mac? Or perhaps you just need a larger drive to hold all the movies you're been downloading? No matter what the reason, before you can use a blank hard drive, you'll need to format it first.

Luckily, formatting a drive is easy, but you do need to make some decisions ahead of time based on how you plan to use the drive. For example will your drive be used only in a Mac? Or if your drive is going to be used for storage, will you need to connect from Windows? Mac? Both?

To keep things simple, we'll walk you through the process of formatting a drive so that you can use it for storage and access your files, no matter what operating system you're using.

Be aware that formatting your drive will erase **all** your existing data. Make sure you've backed up any existing files on the drive before you format.


Back up


Remember, formatting a drive erases all the data on your Mac, so make sure you back up all your files before you begin.

Using Disk Utility in Mac OS X


To format an external or an extra internal hard drive on your Mac, just attach (or install) the drive and open the application "Disk Utility." It's in your Applications > Utilities folder. Select your new hard drive in the menu on the left, then choose the Erase tab in the main window.

Some users prefer to partition their drive, with one partition visible as the C: drive in Windows, and the other being the Mac OS X boot partition. Boot Camp requires that the disk use the GUID partitioning scheme. You can use the Boot Camp Assistant to partition the drive, or do so from Disk Utility's Partition tab.

Now select a drive format. If you're using the hard drive exclusively with Mac OS X, we recommend Mac OS Extended (Journaled). If you'll be accessing the drive from Windows as well, select FAT32.

Once you've selected a format, click the erase button and wait a few minutes for the drive to finish formatting.

Using the Mac OS X install DVD


If you'd like to format the system hard drive inside your Mac, the procedure is the same, but you'll need to boot your Mac from an OS X install DVD or another Mac. If you're using the install DVD, before you start the install process head to the menu bar and select the Disk Utility application. Once Disk Utility opens the process is the same as explained above, but be sure to choose Mac OS Extended (Journaled), which is the recommended drive format for OS X.

Future Outlook


Your hard drive is the last mechanical bottleneck slowing down your PC. Spinning platter drives are already being replaced by solid state drives (SSD) and flash drives. While SSDs remain expensive, capacities as large as 160 GB are already available, and in the very near future even larger drives will be available.

Source from: http://howto.wired.com/wiki/Format_Your_Mac_Hard_Drive

More Tips:

How to Encode Video on Your Mac OS for Free

How to Download Video on Your Mac


Share this post
Repost0
July 16 2012 1 16 /07 /July /2012 08:03

Video Recorder Software for Mac

 Since video tutorials are good presentations to show others a project, there must be many times when you want to record screen activities on your Mac. And if you search the Internet, you will find that there are plenty of video recording and screen capturing tools out there, but vary in functionalities.


If you are just looking for a screen recorder but don't know which to choose, you can simply refer to the following top 3 tools, including QuickTime Player, Any Video Converter Ultimate and Camtasia, to record screen on your Mac OS.


Way 1
 Record Video with QuickTime Player

Many users didn't know that Apple has added the screen recording feature to QuickTime Player in Snow Leopard. It lets you create easy screen activities and share with others. Let's follow the steps below to record video with QuickTime Player.


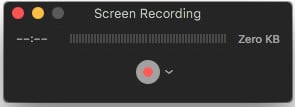
Step 1. Launch QuickTime Player, select File > New Screen Recording.


Step 2. A screen recording window will open. Before you begin to record the screen, you can click the small triangle button on the right to set a few settings.

screen recorder

Step 3. Hit the red "Record" button to start capturing your screen, you will get a hint to ask whether capture the entire screen or only a portion of the screen.


Step 4. Click "Stop" button once you finish the screen recording. Then you can preview

and export the recorded video to save.


Tips: QuickTime Player also allows you to record the audio and movie.


Way 2 Record Screen with Any Video Converter Ultimate

Another video recording software we are going to introduce is Any Video Converter Ultimate for Mac, which is able to record screen and video, including streaming videos, online videos, live sports, etc in fast speed with excellent audio & video quality.


Step 1. Open Any Video Converter Ultimate for Mac and click "Start Record Screen" button.


Step 2. A record setting window will pop up to let you set the FPS, output directory and name for the video ready to be recorded.

record screen settings

Step 3. Hit "Capture" button to begin recording the screen.


Step 4. To stop the recording, you have three options: Either press Command-Shift-1,

or click the Stop icon.


Tips: Any Video Converter Ultimate also allows you to convert the recorded video files into other formats, such as WMV, MPG, MP4, AVI, 3GP, 3G2, FLV, SWF, MP3, WMA, etc

on Mac.


Way 3
 Record Video with Camtasia Mac

The last screen recorder in our list is Camtasia from TechSmith company. This video capture is a best combination of screen recording and video editing. It's more than a simple screen recorder, but gives you the tools you need to truly customize and edit

your videos. This is the most professional and the best of these three screen recorders,

but also costs the most, about 100 US dollars.


Step 1. Load Camtasia Mac 2 and you will get the setting window:


camtasia


Step 2. Choose the preset region of your video recording and hit the red button on the right to view and preset the recording region.


Step 3. Begin to capture the screen activity by clicking "Rec" button.


Tips: After the recording is finished, Camtasia will lead you to a video editing window.

You can then edit the video by adding some special effects, trimming, cutting,

annotations, etc to make it more vivid.


So which way do you prefer?


Buy Now Download Any Video Converter Ultimate for Mac


Share this post
Repost0
July 16 2012 1 16 /07 /July /2012 05:32

With more Macs shipping with SSD drives, keeping your Mac’s disk clean is vital to ensuring that you always have space for apps and important projects. You might think your apps are the main space hogs on your hard drive, but many more resources contribute to disk use than just apps. Continue reading to learn about the ways that you can free up space on your Mac.

1. Delete Apps

We're constantly downloading and installing apps from the rapidly expanding Mac App Store, and we bet you are too. If you download a lot of games, or apps that take up a lot of megabytes, you can regain a lot of space by dusting the virtual shelves of your Application folder.

If you downloaded apps from the Mac App Store, you can easily delete them from inside the Launchpad application in Lion. Simply click and hold on the application you wish to delete, and then select the small “x” in the corner of the app icon. Don't worry if you change your mind later -- you can always redownload the app from the store's Purchased tab...if you have space for it.

If you installed an application from a location other than the Mac App Store, you can delete it by using an application such as App Zapper. This will ensure that all of the app support files are removed in addition to the application itself.

2. Delete Old Documents and iChat Logs

If you have iChat (or Adium) chat logging turned on, then you are collecting multiple text files each time you initiate a conversation with anyone in your buddy list. While these logs are great for archiving past conversations, if you are a constant instant-messenger, you can accumulate a lot of log files very quickly. Pruning the old files can keep your disk clean. You can see and remove your old log files by opening your Home folder > Documents > iChats in the Finder.

3. Get Rid of Mail Downloads

Just like iChat logs, the Mail app in OS X will stow away Mail attachments without any worries whenever you double-click on an attachment in an email to view it or use QuickLook on it.


You may find these files accumulating in large quantities in your Home folder > Library > Mail Downloads in the Finder. You can generally delete any files here without issue. As long as you have the original message, the attachment will be stored with it. However, you can still move any file from this location if you don’t have the original message.

4. Remove Old Log Files

Log files are a way that your Mac archives important system events. Unfortunately, these log files can become a bit unwieldy quickly. Fortunately, you can delete old log files in the Console app (located in /Applications/Utilities).


You can manually delete the log files from within the Console application by right-clicking on any of the files and selecting “Move to Trash,” or you can use an application like Onyx to automate the process.

5. Find iTunes Duplicates

Duplicate iTunes movies, TV shows, and music can lead to more than usual disk usage on your Mac. Luckily, iTunes can help you easily get rid of these dupes. Just open iTunes and select the sidebar item you wish to find duplicates in (Music, Movies, TV Shows, Books, Apps, Tones, etc.).


Next, navigate to File > Display Duplicates. Here, all duplicates for that category will be displayed. If nothing is displayed, the no duplicates have been found. You can remove duplicates that are displayed by selecting the duplicate and pressing Command-Delete, or right-clicking and selecting Delete. When you’re done removing duplicates, click the “Display All” button to go back to the normal iTunes view.

6. Reset Your Browser

Your browser contains many disk-hogging features, including web page caching. Resetting your browser every now and again will free space on your Mac.


You can do this in Safari by clicking Safari > Reset Safari.


You can also do the same thing in Firefox by selecting Tools > Clear Recent History. 

(Source: http://www.maclife.com/article/howtos/6_ways_regain_disk_space_your_mac)


Related:

Three Ways to Record Video on Mac

Six Ways to Download YouTube Videos

Share this post
Repost0
July 13 2012 5 13 /07 /July /2012 11:25

  Apple's new Podcasts app is a testament to the tremendous evolution the medium has undergone since its humble iPod beginnings. Having long outgrown its iTunes tab, it was inevitable that Apple would develop a standalone app to mark the podcast's maturation into a legitimate form of entertainment.


As we've grown to expect from Apple's iOS apps, Podcasts looks great, with large, album-style artwork to accompany subscriptions. Playing a podcast launches a slick reel-to-reel player that's incredibly realistic; flipping a switch literally slows down or speeds up the reels, and you can actually watch the virtual tape run through the machine.

Podcast discovery is the closest thing to a killer feature, offering a clever radio dial interface for browsing "top stations" and a familiar revolving wall that shuttles you off to a dedicated storefront -- where everything is naturally free. The streaming radio selection is somewhat limited, however, merely spotlighting the most popular of each genre, but it's a good way to explore podcasts outside of your comfort zone.


It's a shame that Apple didn't put quite as much thought into the app's real functionality. While podcasts sync well from the iTunes Store, the lack of iCloud integration is a startling oversight; podcasts downloaded on one device don't show up on the other, all but negating any convenience the app would have added. Playback is smooth, but on my iPhone 4 (and even at times on the new iPad) the app was a bit slow to respond and the store was buggy, with the "Subscribe" button often disappearing.

The bottom line. If Podcasts didn't have Apple's signature design, we'd have a hard time believing this first attempt was made in Cupertino.


(Source: http://www.maclife.com/article/reviews/apples_podcasts_review)

More: 

Two Best iTunes DRM Converter for Mac


Share this post
Repost0