Overblog
Follow this blog Administration + Create my blog
May 12 2014 1 12 /05 /May /2014 09:32

The iPhone is an impressive tool with hundreds of brilliant features, but there are several hidden features and tricks that you may not have realised existed – until now. Here, we've picked our 10 favourite iPhone tips and tricks that can help you achieve things quicker and easier, and that you'll wish you'd known a long time ago.

iPhone keyboard tips

You've probably been using your iPhone's keyboard for ages without realising that it's actually easier than you thought to add symbols to your messages. Instead of tapping once on the 123 button and then again on the ABC button when you're done, you can tap and hold the 123 button, then slide your finger to select the symbol you want to insert. Once it's been added, your keyboard will automatically revert back to the letters keyboard.

iPhone keyboard tips #2

That's not all! There are many additional symbols hidden within your keyboard that you may never have discovered. Tap the 123 button to go to the numbers and symbols keyboard, then tap and hold a symbols such as the pound sign to find other currencies.

iPhone keyboard tips #3

This one might sound simple but it's a massive time saver that I know many people don't know about. Instead of going to the symbol menu to find a full stop, you can double tap the space button. It'll add a full stop to the end of the word you've just typed and set you up ready to begin the next sentence.

Shake to undo

This one can be a little awkward at times but it's also a bit of a life saver. If you've just typed a long sentence and accidentally deleted it, you can give your iPhone a shake to bring up the undo/redo button. Just make sure you're holding onto your iPhone tight before you shake it!

Tap to go back to the top

Just scrolled down a really long list in notes or a whole ton of emails? You can tap at the very top of the iPhone's screen to go straight back to the top. This works in most iPhone apps.

Delete the last digit in the calculator by swiping

If you use the calculator app a lot there's a handy time-saving trick you might not know exists. If you've just typed a long number and want to delete the most recent digit you entered, you can swipe left or right in the black area where your calculation appears.

Stop music with a timer

This is a cool trick for those of you who enjoy falling asleep to music. The problem with that is it'll still be playing when you wake up in the morning, and you've probably just drained most of your battery in the process. Using the hidden 'Stop Playing' timer, you can choose how long you want the music to play for as you drift off to sleep.

To set up the timer, go to the clock app and then tap 'Timer' in the bottom right of the screen. Choose how long you want your timer to last for (you can choose a matter of minutes or hours if you'd prefer) and then tap 'When Timer Ends'. Here, scroll down to the bottom of the menu and select 'Stop Playing'. Press start on the timer and then begin playing your music from the Music app. When the timer ends, the music will fade to a stop.

This trick will also work for audiobooks and other media.

Get your iPhone's flash to blink when you get a message

If you find that the vibration or sound that your phone makes when you get a message is not always enough to attract your attention, there's another element that you can add to the alert – light. By going to Settings > General > Accessibility and scrolling down to the 'Hearing' section (this feature is designed for people with hearing impairments), you can turn on 'LED Flash for Alerts'. Now every time you get a notification, the flash next to your iPhone's rear-facing camera will blink.

Triple Click shortcuts

Another accessibility setting that could come in handy is the Accessibility Shortcut, which can be found by going to Settings > General > Accessibility and then scrolling right down to the bottom. Tap 'Accessibility Shortcut', and you'll see a menu of options. From here you can activate the Home button triple click, which can be used to invert the colours of your iPhone for better visibility in low-light, zoom in to tricky-to-see parts of the screen and more.

Use your headphones to take a selfie

Selfies are all the rage right now (as we're sure you've noticed) so this handy trick can help you get a better shot. When the camera app is open on your iPhone, you can use the volume up button on your headphones to take a photo. Not only does this reduce shake, it also means you can take a more natural-looking photo from further away or take a photo hands-free.

Source: Macworld.co.uk

Share this post
Repost0
May 12 2014 1 12 /05 /May /2014 03:44

ztylus-zgs-4-1

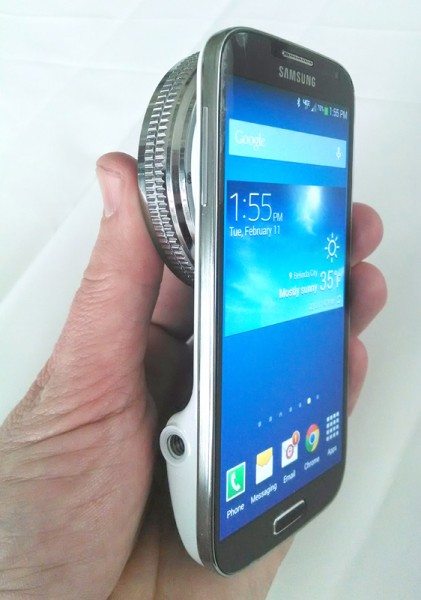
Torn. Conflicted. Confused. Verklempt.  Ok, maybe not verklempt, but conflicted, yes.  I am one of those people who gave up the traditional digital camera and exclusively use my Samsung Galaxy S4 as my digital camera.  It’s with me all the time, right?  And like many of you I have struggled to take good pictures consistently because, let’s face it, no matter how good the smartphone cameras get they still aren’t good enough.  And like most of you, I don’t know enough about picture-taking to alter all the ISO settings, exposure, and whatever else is on there, every time I want to take a picture. Oy vey. I just snap away.  So when I saw the Ztylus Revolver Smartphone Camera Kit (pronounced just like ‘stylus’), a gadget that you attach to your Samsung Galaxy S4 to improve the camera and your pictures, I jumped. So why I am so torn, conflicted, and confused? Read on.

Camera devices that attach to your smartphone to improve the camera are not new, to be sure.  It seems that there are new ones coming out all the time for the iPhone for example.  But this is the first device that I have run across that was made specifically for the Galaxy S4 and that replaces the back of the phone with the camera attachment. I was intrigued. What I got was the Ztylus Revolver Smartphone Camera Kit, which contains 2 devices: the ZGS-4 Camera Case and the RV-1 Revolver Lens Attachment. You can purchase them separately, but you can’t use the Revolver Lens Attachment without the Camera Case, so you’ll need to buy that to get the lens I will talk about in a minute. The kit can be had at several places online for around $85, or you can get just the Camera Case for $30 and the Revolver Lens Attachment for $60.

Specifications and Descriptions

First, the specs and a little description of each part.

Camera Case:

  • Ergonomic Hand Grip
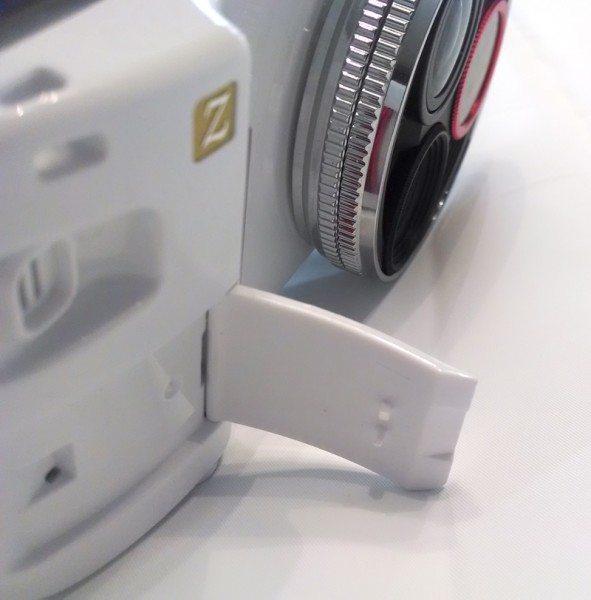
  • Foldable Kick Stand
  • 1/4-20 tripod mount ready
  • Sound Redirect
  • Camera Strap Ready

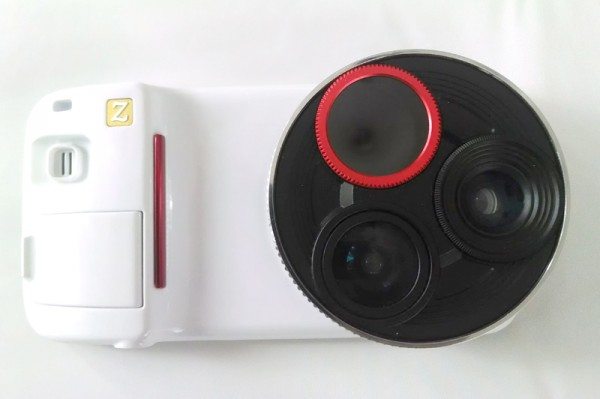
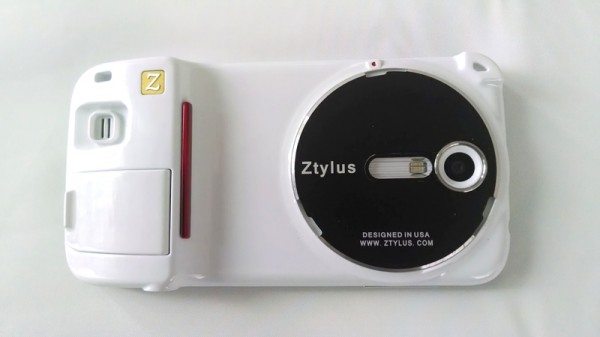
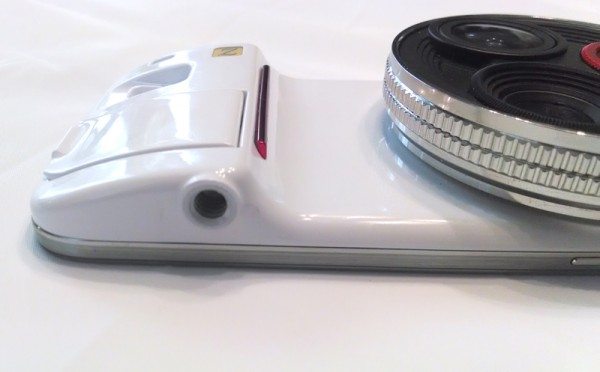
The Camera Case is made of smooth plastic, much like the back of the Galaxy S4 and it is basically a replacement for the back of your phone. So you remove the back and pop on the Ztylus. On one end of the Case you will see a bump that serves as the hand-grip when you are holding the phone like you would a digital camera. It also has a ¼-20 standard tripod mount if you want to attach the phone to a tripod.  I have a tripod, but I have yet to use it with the Ztylus. The Case also has a kickstand which is very handy. My old HTC Thunderbolt had a kickstand and I missed it terribly when I changed phones. The last thing I’ll mention is the indentation that sits over the S4’s speaker. The product description says that this little part of the Camera Case is called the ‘sound redirect’ and that it is supposed to greatly enhance the sound output from the S4.  I can wholeheartedly agree with that one!  More on that in a minute.  Here are a few pictures:

Without the Revolver Lens Attachment:
ztylus-zgs-4-2

With the Revolver Lens Attachment:
ztylus-zgs-4-3

ztylus-zgs-4-4

Revolver Lens Attachment:

  • Sturdy yet flexible construction
  • CPL(Circular Polarizer Filter)
  • Wide Angle Lens
  • Super Micro Lens
  • Extreme Fish Eye Lens

The Lens attachment is constructed with aircraft grade aluminum and metal. It has several little tabs around the outside of it, and to attach it to the Camera Case you line up the tabs into little slots on the Camera Case and rotate it to lock it in place.  If you have ever owned a DSL-R and attached a camera lens, it’s exactly like that. The outward facing part of the Revolver Lens rotates in a circular fashion with your hand so you can switch between the 3 lenses (one of them does double-duty with 2 lens). The Revolver looks and feels very much like lenses I have used with my DSL-R cameras of the past.  The CPL and Extreme Fish Eye Lens are 2 of the 3 lenses, and the other lens is the Wide Angle Lens.  To access the Super Micro Lens you use your fingers to unscrew the top part of the Wide Angle Lens and remove it, showing you the Super Micro Lens beneath.

ztylus-zgs-4-5

Performance

The ‘sound redirect’ indentation I mentioned is awesome. It really amplifies the sound from the crappy S4 speaker, and makes listening to music or movies so much better, as well as speakerphone calls. The kickstand is awesome for propping the phone up for Skype calls, watching movies or videos, or just sitting on my desk at work so I can see incoming calls and text messages easier.

The Revolver Lens is a great addition to the S4’s camera, and I have provided a picture gallery below so you can see numerous examples of photos I took with and without the Revolver Lens Attachment so you can see the difference it makes. The bottom line is that the Revolver Lens Attachment makes the S4 camera much better in my opinion, and I am taking better pictures because of it.  If you like taking pictures with your S4, this will make you a better picture-taker.

Here is a description of each lens:

Fish-eye lens – If you know what fish-eye view looks like, then you know what this lens does. It simply provides you with a creative way to take a photo with a 180-degree field of vision.

Circular Polarizer Lens (CPL) – This lens does a fantastic job of greatly reducing glare, improving contrast, and enhancing color saturation.  Basically, the grass is greener and the sky is bluer, and the glare off the water is gone. And it works for both pictures and video. This is the lens I use the most.  I also use this lens in conjunction with the HDR mode on the phone, which also enhances color saturation.  I find that using both together provide much better photos.

Wide-Angle lens – It does what it says. It enables you to get more of the image into the frame.

Micro lens – This lens does an amazing job of providing you a super-close view of your subject at 10x zoom. You won’t be using this to zoom into your kid scoring that soccer goal, but you will use it to take close up pictures of nature, and to read the occasional tiny printed text on stuff.  Hey, don’t judge.

ztylus-zgs-4-6

Picture Gallery

Click the thumbnail to view the full-size version of each photo (NOTE: some of these photos are very large)

Micro Lens:  Normal shot VS close-shot (red markings indicate close-up area)

ztylus-flower1-small  ztylus-flower1-closeup-small

ztylus-flower2-small  ztylus-flower2-closeup-small

ztylus-flower3-small  ztylus-flower3-closeup-small

ztylus-rock-small  ztylus-rock-closeup-small

Panoramic S4 shot:  Normal camera lens VS Fish-Eye lens

ztylus-panoramic-normal-small

ztylus-panoramic-fisheye-small

Wall of pictures:  Normal camera shot VS Wide-Angle VS Fish-Eye

ztylus-shot-normal-small  ztylus-shot-wideangle-small  ztylus-shot-fisheye-small

CPL lens:  Normal camera shot VS CPL Lens shot  (Notice the greener color of the grass on the left side and the trees in the middle in the second picture)

ztylus-scene-withoutCPL-small  ztylus-scene-withCPL-small

Video shot with/without CPL lens:  These are screen-capture shots from video taken with my S4.  The first one is from video NOT using the CPL lens. The second one is from video using the CPL lens. As you can see, using the CPL lens makes all the colors deeper and richer.

ztylus-screencap-withoutCPL-small  ztylus-screencap-withCPL-small

Conflicted Feelings

It took me a long time to finish this review because I wanted to make sure that my conflicted feelings weren’t misplaced, so I forced myself to use the Ztylus for a long time on a daily basis to confirm what I was thinking.  My first thought when I attached the Camera Case and Revolver was… ‘This is so cool’.  After a few minutes though my thought was… ‘Do I really want to carry my phone around with this thing on it?’  And therein lies my conflict.  Let me explain.

Considering just the Camera Case, I am ok with carrying my phone around with this as the back of my phone.  The bump for the handle is big, no doubt, and it does draw some curious glances. And you can’t lay your phone flat on any surface because of that bump. But it does fit into my pockets fine I suppose. I carry my phone in my pants or jacket pocket daily, so I don’t use a holster of any kind.  For those of you who do that, I am pretty confident that the phone won’t fit into your holster with the Camera Case attached.  But does the Camera Case alone provide enough reason for me to leave it attached to my phone on a daily basis?  For me, that answer is no.

The phone is easier to hold with the Camera Case on it when using it as a camera, I admit.  And the kickstand is great too. But I don’t watch movies or listen to music from the speaker very often. And I don’t carry my tripod around every day either, so I don’t use the tripod mount on the bottom. So I like the features of the Camera Case, but I don’t use any of them on a daily basis.

Considering pocketability again, if you attach the Revolver Lens to the Camera Case, then forget it.  It was just too awkward to slide the whole thing into my pants or jacket pocket. It just adds too much girth.  Plus, there is no cover for the Revolver to protect the lenses so you won’t want to throw this around inside your bag/purse anyway.  You’ll want to remove it and use the cushioned carrying case that comes with the Revolver to protect the lenses. (The Camera Case comes with one too, by the way)

So you can probably see why I am torn.  I am taking better pictures (and video by the way) with the Ztylus Kit. But I don’t have enough reason to keep the Camera Case attached to my phone all the time and I certainly am not going to carry it around with the Revolver Lens Attachment on it. And if you are like me, most of your pictures aren’t planned and you take pictures when the moment happens, am I right?  Most of my pictures aren’t planned, I just take the shot on the spur of the moment. So I don’t carry around the Ztylus Case and Revolver with me everywhere I go to enable me to hurriedly pop it on to grab that picture I want.

The Bottom Line

So for me the bottom line has ended up being this: if I am going somewhere that I know I will be taking pictures… my kid’s ballgames, a wedding, a school program, the family vacation, etc, then I attach the Ztylus kit and head out. But on a daily basis it just doesn’t make practical sense for me to keep them attached to my phone, which means for those spur-of-the-moment snapshots I don’t have the Ztylus to help me make better photos.  Do I recommend the Ztylus Kit?  Absolutely.  It will enable you to take much better pictures, no doubt, and the price is great in my opinion for what you get. And for me, I use it for situations where I know I am going to use it.  But if you are the type of person who never, ever anticipates your picture opportunities, then you probably won’t end up using the Ztylus Kit.

Source: The-Gadgeteer.com

Share this post
Repost0
May 11 2014 7 11 /05 /May /2014 06:47

http://main.makeuseoflimited.netdna-cdn.com/wp-content/uploads/2014/04/android-macbook-air-840x420.jpg?89af50

iCloud is a great way to keep your e-mail, contacts, calendar, and tasks synced across your Apple devices. But what if you decide to switch from an iPhone to an Android phone? Or if you get a Mac for work? Apple doesn’t always play nice with other ecosystems, but you can access iCloud from your Android with the right apps.

E-mail

Every Android device comes with the Gmail app as well as an app called Email, and this is the app that we’ll be using to access your iCloud e-mail. You can also use an alternative e-mail app, if you so choose. If you’ve set up an IMAP or POP3 e-mail address before, this process will be familiar to you. If not, don’t worry—it’s quite easy.


1. Open the Email app and tap the menu button in the top-right corner. (If you’ve never used the Email app before, just open it and go to step #3.)


2. Tap Add Account.


3. Enter your iCloud e-mail address and password, then tap Next.


4. Select IMAP and tap Next.


incoming server settings Need To Access iCloud On Your Android? We Can Help!


5. When you see the Incoming Server Settings page, remove the “@icloud.com” from your username. 

 6. Change the IMAP server to “imap.mail.me.com.”

 7. Set the security field to SSL/TLS (Accept all certificates).

 8. Make sure the port is set to 993, then tap Next.

outgoing server settings Need To Access iCloud On Your Android? We Can Help!


9. On the Outgoing Server Settings page, change the SMTP server to “smtp.mail.me.com.


10. Change the security setting to STARTTLS and make sure the port is set to 587 and “Require sign-in” is checked.


11. Tap Next to complete the process.


Once you’ve gone through this list of steps and saved your changes, you’ll be able to access your iCloud mail via the Email app on your Android phone. Pretty simple!

If you have any difficulties with this, you can try changing the security type in the incoming or outgoing server settings. The combination of security settings that I mention above is the one that worked for me, but you might find that you need to use a different one.

Contacts

Syncing your contacts between iCloud and Android isn’t quite as simple as adding your iCloud e-mail address. However, some developers have created apps that will help you out and make the process a lot easier. The easiest way to go is to install SmoothSync for Cloud Contacts($3.99), which was created specifically for syncing your iCloud contacts with your Android phone.

To use the app, just download it and enter your iCloud username and password. Your iCloud contacts will now be synced with your Android ones! Note, however, that you should probably install and run the JB Workarouund Cloud Contacts app(free) first.

If you’d rather use a free option, you can download CardDAV-Sync beta(free) and use the instructions below.

Note: the workaround apps for SmoothSync and CardDAV-Sync Beta are different apps. You don’t need the CardDAV-Sync workaround app for the free version, but there’s a paid version of CardDAV-Sync Beta that requires the workaround.

1. Install and open CardDAV-Sync Free Beta.

add carddav account Need To Access iCloud On Your Android? We Can Help!

2. In the server name or URL field, enter “contacts.icloud.com.

3. Enter your Apple ID and password in the username and password fields then tap Next.

name carddav account Need To Access iCloud On Your Android? We Can Help!

4. Enter a name for the account, and decide whether you’d like one-way or two-way sync.

5. Tap Finish to complete the process.

Your contacts will now be synced between your iCloud account and your Android device — and if you’ve already synced your iCloud contacts with your iPhone or iPad, you’ll be able to access them wherever you are.

Calendar

Just as with the contacts, there are two different apps that I’ll recommend. The first is SmoothSync for Cloud Calendar($2.98) — it’s created by the same developer as SmoothSync for Cloud Contacts. Using it is just as simple. Download and install it, enter your username and password, and let it go to work. Easy!

This developer has also published CalDAV-Sync($2.89), an app that allows you to sync any CalDAV or Webcal calendar to your Android device. While it’s not free, it’s well worth the price tag if you want to sync up iCloud and your Android. The setup is exactly the same as above, but uses the JB Workaround CalDAV-Sync(free) workaround app and a different server name.

1. Install the workaround app and run it.

 2. Install and open CalDAV-Sync.

add caldav account Need To Access iCloud On Your Android? We Can Help!

3. In the server name / URL field, enter “calendar.icloud.com.”

4. Enter your Apple ID and password in the username and password fields, then tap Next.

select calendars Need To Access iCloud On Your Android? We Can Help!

5. Select the calendars to sync, then tap Finish.

Once you’ve done this, you’ll see your iCloud calendars show up in whichever calendar app you normally use.

add account caldav sync Need To Access iCloud On Your Android? We Can Help!


If you’d rather use a free app, you can use Caldav Sync Free Beta, which is confusingly not created by the same developer as the apps listed above. Instead of providing an app in which you can enter your information, it simply adds a CalDav Sync Adapter option in the Add Accounts pane of the settings.

Notes

Fortunately, syncing your notes from Apple's very useful Notes app with your Android account is simple, though it does come with some limitations. To sync your notes, open up System Preferences from your Apple computer and click on Internet Accounts. Select the Google account that’s associated with your Android.

internet accounts google Need To Access iCloud On Your Android? We Can Help!


Here, you’ll see a number of things that you can sync with your phone. By selecting Notes, everything that you add to your Notes app will be sent to your phone. Where will it show up? In your Gmail app, in a new label called Notes. This is a bit counterintuitive.

icloud note gmail Need To Access iCloud On Your Android? We Can Help!


This has the disadvantage that when you sync your notes with your phone, they won’t sync with iCloud. In your desktop Notes app, you’ll see that you have notes under the Google heading and notes under the iCloud heading—they don’t get pushed to both. This is annoying, but if you have certain notes that you think might be good to have on your phone, you can push them there, while others can get backed up to iCloud.

inotes android Need To Access iCloud On Your Android? We Can Help!


The main limitation of this method is that you can’t edit your notes from your phone. The easy solution to this is to use iNotes($2.99). Note that this app looks like it was made by Apple, but it wasn’t, and it will let you edit your notes from your phone.

Of course, you can always switch to Evernote and have your notes available wherever you are, on any device, to read and edit.

Reminders

If you use Apple’s Reminders app to keep track of your tasks, you can get access to them on your Android through a few different apps on your phone. If you’re using CalDAV-Sync or SmoothSync, you can do this quite easily by downloading Tasks(free) from the same developer. Because CalDAV provides support for task sync, Tasks simply piggybacks on the CalDAV connection set up by the other app to get your reminders.

reminders tasks Need To Access iCloud On Your Android? We Can Help!


Tasks is very simple and doesn’t provide a lot of extra functionality, giving it a similar feel to the Reminders app on your Mac, iPad, or iPhone. It’s also free, which makes it a very appealing option.

If you’re not planning on using CalDAV-Sync or SmoothSync, or you just want a different app, you can download Reminder for iCloud/iOS/iPhone ($2.99). It provides the same functionality and syncs with iCloud. Unfortunately, Reminder for iCloud/iOS/iPhone isn’t free, and at $3 it’s tough to justify it over a free alternative.

Conclusion

Syncing iCloud and your Android can take some time to get set up, but it’s well worth the effort if you have e-mail, contacts, calendars, and other data that you want to sync between your various devices.


Source: Makeuseof.com

Share this post
Repost0
May 11 2014 7 11 /05 /May /2014 05:48

mini-everpurse

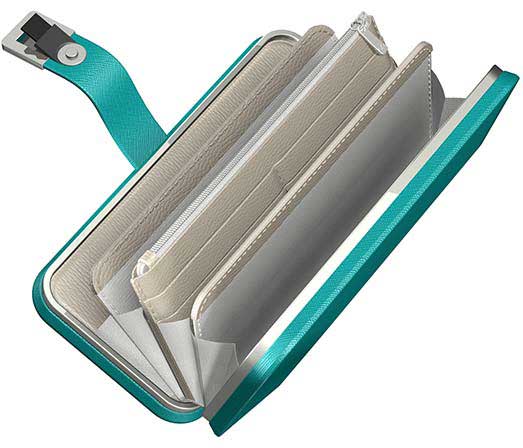
Do you remember the Everpurse iPhone charging clutch purse and handbags that we have covered here (see related links below) in the past? The company behind those products has just introduced the Everpurse Mini charging hard-shell wallet. The Mini can charge your iPhone 5/5S from zero to 100% three times. The iPhone docks right on the outside of the wallet without the need for any additional cables. While it is docked, it can be used for calls, texting or surfing. Like any other wallet, the Everpurse Mini has slots for cash, credit cards and ID and is small enough to fit inside a larger handbag or can be carried with the included wristlet and shoulder strap.

The Mini has been designed for the iPhone 5/5S, but  the company has plans to expand to support top selling Android phones and the iPhone 6.

The Everpurse Mini is available for pre-order today at Everpurse.com and will begin shipping summer 2014. This first Mini collection is priced at $129, with an early bird price of $98 ending on May 6.

Source: The-gadgeteer.com

Share this post
Repost0
May 10 2014 6 10 /05 /May /2014 05:55

With older devices like iPhone 4 and 4s, an upgrade to iOS 7 or 7.1 can put your iPhone in the dreaded recovery loop. Connecting to iTunes to restore has no effect and your iPhone is stuck in the recovery modefor eternity.

When this happens, what do you do? How to kick the iPhone 4/4s out of the recovery mode and update successfully to iOS 7 or 7.1? Also, if you need to save data in the process, how to do that?

iPhone 4 4s Stuck in Recovery When Updating to iOS 7-7.1

RecBoot to Kick out of Recovery
If the iPhone is stuck in the recovery mode, all you’re going to see on it is the iTunes icon and the cable – telling you to plug your device to iTunes and restore. But the problem in our case is restore doesn’t work. Which means there’s something wrong with the way your iPhone lapsed into the recovery mode. Our first option, then, is to kick it out of the recovery mode.

One easy way to do this would be to use a software. RecBoot does it pretty neatly. It comes with two buttons: Enter Recovery Mode and Exit Recovery Mode.

  • Connect your iPhone to the computer
  • Start RecBoot
  • Next, click on Exit Recovery Mode
  • This should (hopefully) get your iPhone switched off. Power it on and it should be booting up normally.
  • Next up, connect to iTunes. Don’t upgrade/update. Backup the iPhone and then do a clean restore.

Getting into Recovery Mode, Correctly
If the iPhone got into a problematic recovery mode, that could be one of the reasons why iTunes refuses to restore the device correctly. One way of fixing this would be to put your iPhone into the recovery modeagain, manually.

To do this (if your iPhone is now on the recovery mode screen):

  • Disconnect the iPhone from the computer
  • Press the home and power button simultaneously till the screen goes blank
  • Now, press the home button (keep pressing it) and connect the iPhone to the computer
  • The iPhone should now show the Apple boot logo
  • And it will enter the recovery mode
  • Now, fire up iTunes and try restore

(note that in this method, we’re assuming that you have a backup already.)

DFU Mode

If the objective is to upgrade to iOS 7 or 7.1 (assuming you have backups already), the DFU mode can be helpful. The DFU mode is specifically for iTunes to proceed with the device upgrade without throwing any errors.

To get your iPhone into the DFU mode:

  • Switch off the iPhone
  • Press the Power button for about 2 seconds
  • Then, press the home button (while keeping the power button pressed) for about 10 seconds
  • After this, release the power button but keep the home button pressed for about 15 seconds
  • This puts the iPhone in DFU mode.

There is nothing visibly different on the screen that tells you your iPhone is in DFU. But when you connect to the computer, iTunes will inform you that the iPhone is in DFU. You can then proceed to upgrade the firmware without a problem.

Running into Other iTunes Errors Afterwards
After this process, as iTunes tries to restore and upgrade your iPhone, you might run into other errors like 3194 or 16xx. You’ll have to follow the links to try to fix these issues.

What if nothing works?
Or what if you don’t have a recent backup but you definitely need to protect the data? Try third-party software such as Wondershare Dr.Fone iOS Data Recovery to get iPhone out of recovery mode. Or, take your iPhone to the Apple store. The methods outlined above usually involve restoring the iPhone as new and then using a previous backup to get the data back on your iPhone. If you did not backup most recently but have data on the iPhone that’s vital, you might not be able to restore till you safely copy the data to someplace.

If you are able to successfully power up the iPhone and get the backup rolling, you can then try all kinds of workarounds to restore successfully. In the off-chance that you aren’t able to do that, the Apple store is the next best solution.

Note: the recovery mode issue seems to affect – mostly – older iOS devices like the iPhone 4 and 4s. If an iPhone 5s/5/5c ends up in the recovery mode too, you can follow the same steps.

Source: iGeeksblog.com

Share this post
Repost0
May 10 2014 6 10 /05 /May /2014 05:46

http://s1.reutersmedia.net/resources/r/?m=02&d=20140509&t=2&i=895542497&w=580&fh=&fw=&ll=&pl=&r=CBREA480TYT00

(Reuters) - Apple Inc will unveil the next incarnation of its popular iPhone series in August, one month earlier than industry watchers were generally expecting, Taiwanese media reported on Friday citing unidentified supply-chain sources.

 A 4.7-inch screen version of the iPhone 6 will reach stores in August, the Economic Daily News reported without specifying which markets would receive the phone first.

A 5.5-inch or 5.6-inch model will be released in September, the newspaper said, as the iPhone 5 series was previously.

People involved in the supply chain had earlier confirmed to Reuters that there will be a 4.7-inch version of the iPhone 6 and a 5.5-inch version.

Together, the Economic Daily News said 80 million iPhone 6 handsets would be produced this year.

Industry watchers have said increasing the iPhone's screen size from 4 inches would help Apple regain market share from competitors such as Samsung Electronics Co Ltd, who they say have responded to consumer desire for more screen size.

Representatives for Apple could not be reached for comment.

Representatives for Taiwanese iPhone contract manufacturer Hon Hai Precision Industry Co Ltd and smartphone camera lens maker Largan Precision Co Ltd, both mentioned in the Economic Daily News report, had no comment.

Source: Reuters.com

Share this post
Repost0
May 9 2014 5 09 /05 /May /2014 07:39

ios7tipsandtricks primary

Whether it’s the first time you’ve picked up an iPad or the seventeenth time you’ve pulled out your iPhone today, there are probably still some iOS 7 features and functionality that you’re not familiar with. Don’t sweat it: We’re here to help. We’ve collected some of our favorite and most useful tips and compiled them here, just for you.

Make iOS 7 look nicer

There are several settings you can change to make iOS 7 easier on the eyes.

1. Make the text larger and bolder:As nice as the thinner version of the Helvetica Neue font is in iOS 7, it’s not always the easiest to read. If you’re having trouble reading text on your iPhone or iPad, just go to Settings > General > Accessibility > Larger Textto increase the default font size on your device. You can make that font size even larger in apps that support it by enabling Larger Accessibility Sizes. And if you want Helvetica Neue to show up just a bit bolder, visit Settings > General > Accessibility and enable the Bold Text slider. (Note: You will have to restart your iPhone when you enable Bold Text.)

2. Buttons, buttons, everywhere: iOS 7 has ditched most of the traditional buttons present in past versions of Apple’s mobile software, but if you’re jonesing for that old familiar arrow shape, you can enable it via Settings > General > Accessibility > Button Shapes.

3. Contrast is key: Some of us like white text on light backgrounds, but others find it causes headaches and hurts their eyes. If you’re part of that latter group, there are several options for your viewing pleasure under Settings > General > Accessibility > Increase Contrast.

If you want to increase the text and background contrast for features like Control Center and Notification Center, turn on the Reduce Transparency option.

If you wish to darken the highlight colors found in an app’s menu and tab bar (the pink color of the Music app, for instance), toggle the Darken Colors switch.

And if you’d like to darken the white backgrounds found in apps like Settings, the Reduce White Point screen brings the pure white coloration down to a more ocularly-friendly light grey.

On the map

4. Turn-by-turn walking directions: We’ve long had the ability to do turn-by-turn directions for driving, but iOS 7 also adds the ability to get those same prompted directions when you’re on foot. Just tap the Directions button in the top left hand corner, select the Walking icon at the top of the screen, enter your destination, and tap Route. Siri will guide you to your destination, alerting you by voice when it’s time to make a turn.

5. Prefer walking directions: Say you’re on vacation and don’t have a car: Wouldn’t it be useful if you didn’t have to remind Maps that you want those walking directions every time you put in a location? Easy enough: Just go to Settings > Mapsand scroll down to the Preferred Directions section. There you’ll be able to choose between Driving and Walking. Now, when you launch Maps, it’ll give you pedestrian-friendly directions by default.

Apple's free Find My Friends app lets you set geofences on friends so you can be notified when they leave or arrive at a location.

6. Notify you about your friends’ location: Apple’s free Find My Friends app can be super useful at times, such as when you’re meeting up with a friend. You can even use the app to automatically tell your friend when you’re heading out—or be notified when your friend is arriving someplace—all thanks to geofences.

Just launch the Find My Friends app, select the friend you want to be notified about and tap the More… button in the toolbar. At the bottom of the contact card, choose either Notify Me or Notify [your friend’s name]. You’ll be prompted to choose whether the notification will show up when you arrive at or leave a place, as well as specifying the location (and even how big a radius from that location will trigger the notification). If you choose to notify your friend about your location, you can also send a message immediately.

7. Ask Siri to notify you about your friends’ location: If setting up those geofences is a little too cumbersome, you can ask Siri to handle it for you. Just trigger the virtual assistant and say, for example, “Notify me when John leaves his current location.”

8. Geofencing in Reminders: Not only can you can set geofences on people, you can also place them on locations. Using the Reminders app, you can have a notification sent to you when you’re arriving at or leaving a location. Just create a reminder, tap the ‘i’ button next to it, and choose “Remind me at a location.” Under the Location sub-menu, search for a contact, place name, or specific address; as with Find My Friends, you can even specify the size of the radius around the location, just in case you want to be reminded to get cookies when you’re even remotely near the supermarket.

Master your photos

Accidentally take 88 burst mode photos when one or two would do fine? You can weed them out in the Camera Roll.

9. Save your favorite Burst Mode images (iPhone 5s): The iPhone 5s’s Burst Mode is an excellent way to ensure that you capture fast-moving action, but you also don’t want to take up lots of space with photo duplicates. After you’ve captured an image in Burst Mode by pressing and holding down the shutter button for a few seconds, you can tap the Camera Roll to view your images.

Your burst appears as a single photo in the album, represented by what iOS 7 thinks is the best photo of the bunch. You can go back and look through the full burst collection, however, by tapping the Favorites button; select the photo (or photos) you’d like to showcase by tapping on them and pressing Done. From there, you can choose to keep the entire burst for future perusal, or delete all the images you chose not to select.

10. Enable automatic HDR (iPhone 5s): Back in 2010, iOS 4.1 added the High Dynamic Range (HDR) feature to its Camera app, which allowed you to take a photo of a subject with both sharp light and deep shadow and have it render as evenly lit. But HDR took longer to shoot than the average image, which for most people meant manually turning it on whenever you wanted to capture that perfect sunset.

With iOS 7 and the iPhone 5s, however, you can turn on automatic HDR mode: In normal light, your iPhone will shoot a regular photo; in situations with multiple light patterns, however, your device will automatically recognize that an HDR photo might be best and attempt to capture that, instead. (As always, the iPhone always takes two photos–the untouched one and the HDR version; you can save both to your Camera Roll if you wish by going to Settings > Photos & Camera > Keep Normal Photo.)

11. Put permanent filters on your camera: Both the iPhone and iPad offer front and back hardware cameras, and on the software side, fun filters for Photo and Square modes to make your pictures more interesting.

If you like having a specific filter on images, you can set either Square or Photo mode to always launch with the image manipulation of your choice. Personally, I have iOS 7’s Square mode set to the Noir filter, as I like Apple’s black and white correction more than, say, Instagram’s.

To set the filter, all you have to do is tap the Filter button in the Camera app while in the mode of your choice. Switch to another mode and you’ll once again have a clean slate, but return to your original mode and your filter of choice remains.

12. Share your Photo Stream with others (and let them add images, too):When Shared Photo Streams first launched with iOS 6, they let you share groups of images with any of your friends for liking and comments, but your buddies couldn’t add images or video of their own.

iOS 7 has changed all that, letting you open up your Shared Photo Streams to anyone you deem fit for posting. Now, when you create a shared stream, viewing it presents you with two tabs: Photos and People. Tap the People section to access your stream’s settings; there, you can turn on or off the Subscribers Can Post toggle. (You can also choose to create a public website, add or delete friends to your stream, and show notifications for the stream.)

13. Use iMovie to create slo-mo clips: iPhone 5s owners can make slow-motion clips to their heart’s content thanks to iOS 7’s 120FPS slo-mo mode in the Camera app. But older iPhone owners can get in on some of that fun, too—they just need to download iMovie.

After you’ve filmed something, open iMovie and create a new project with your clip. Next, separate your clip into three segments by swiping down on the film strip: the intro normal-speed segment, a slow-motion segment, and the ending normal-speed segment. Finally, tap on the middle segment, choose Speed, and drag the slider toward the Tortoise icon. Voilà: easy in-and-out slow-motion.

Phone it in

You can see a list of all the numbers and contacts you've blocked in Settings > Phone > Blocked.

14. Block annoying calls: We haven’t solved the problem of email spam, but telemarketing can be slightly less annoying with a new feature of iOS 7: call blocking. You can choose to not receive calls from a specific number or contact by tapping the ‘i’ button next to that entry in the Recents or Voicemail sections of the Phone app, scrolling down, and choosing Block this Caller. (It also works on any contact card in the Phone or Contacts app.) Note that by doing so you also won’t receive text messages/iMessages or FaceTime calls from that number or contact. If you’ve blocked someone in error, you can edit the no-call list under Settings > Phone > Blocked.

15. Make FaceTime Audio calls for cheap: Calling plans are pretty cheap these days, but if you’re looking to pare down, you can make FaceTime Audio calls over Wi-Fi or cellular data networks. Just make sure you’ve enabled FaceTime in the Settings app, then find an entry in the Contacts or Phone app and tap the phone icon next to FaceTime. You’ll immediately launch into an audio-only FaceTime call, though you can switch over to a video call at any point by tapping the FaceTime button. You can even add a FaceTime Audio call to your Phone app’s Favorites by tapping Add to Favorite on any contact card, and then selecting FaceTime Audio.

Adding a conference code or extension to a number lets you dial it automatically just by tapping the button that appears in the bottom left.

16. Enter a phone conference code at a tap: Many of us have had to dial either hard-to-remember extensions or conference room codes at some point. If you find yourself making those calls frequently, you can simplify the process. Go to the Keypad section of the Phone app and enter the phone number you dial; then, at the end, tap and hold the pound key until it turns into a semicolon. Now enter the passcode or extension, and then add the whole shebang to a new or existing contact record. Next time you dial that contact or number, you’ll see a small button in the bottom left that says “Dial” with the code you entered; tap that to have it entered on the keypad automatically.

Talk to Siri

17. Speak your settings: Siri’s become a bit smarter across the board in iOS 7, and one of those IQ improvements deals with controlling your settings. You can ask Siri to turn Bluetooth on or off, open a specific Settings pane, and even turn on Airplane Mode—though Apple’s voice assistant gets a little snarky if you ask for that last one.

18. Make Siri better understand your friends’ names: If you heard it spoken out loud, my little sister’s name is a pretty standard one—“Caitlin.” Unfortunately, that’s not how my parents chose to spell it; instead, her contact card reads “Caetlyn.” In iOS 6, Siri had a bit of trouble with that, expecting me to either pronounce her name “Keet-lan” or use the nickname I’d given her. Thanks to Siri’s new pronunciation engine, though, my phone can be a little smarter about her contact card—along with any of yours.

Just say “Learn how to pronounce [name]’s name” and Siri will comply, first asking you for your pronunciation of the first and last name, then providing you with several pronunciation options.

19. Talk and talk and talk and talk to Siri: Raise your digital hand if you’ve ever run into this situation when talking to Siri:

“Remind me to—” “What would you like me to remind you?”

Siri may be there for us, but sometimes, she’s just not listening as closely as she should be. If you have iOS 7.1 installed, however, you can hold down the Home button to make Siri listen as long as you like—she won’t stop until you lift your finger. Helpful for recording the entirety of messages and reminders; even more helpful when you just need someone to talk to—even if that someone is digital.

Navigate the jungle of Safari

From Safari’s Settings you can assign any folder from your bookmarks as Favorites, which show up when you load a blank tab.

20. Playing Favorites: In iOS 7 there’s a new bookmarks section called Favorites; on the iPad, this is used to populate the Favorites Bar in Safari, but on both the iPad and iPhone, it also determines which bookmarks pop up when you’re in a blank tab. You can make Favorites work for you by going to Settings > Safari > Favorites, where you can select any folder in your Bookmarks as your Favorites. Now when you open a blank tab in Safari, you’ll see those specific sites are just a tap away.

21. View saved passwords and credit card info: Whether or not you have iCloud Keychain syncing password information between your iOS devices and/or Macs, you can have Safari on your iOS device save your usernames, passwords, and credits cards locally. In both cases, you can take a look at the information under Settings > Safari > Passwords & AutoFill. In both cases, you’ll have to enter your device’s passcode—sorry, no Touch ID here—to view the full credit card number or password; it’s yet another reason to choose a strong passcode, as though you needed one these days. Both sections let you remove entries, but the Credit Cards section will also let you add a new card right from Settings.

Mail call

Tapping Edit on Mail's main screen lets you add several special mailboxes, including Flagged messages, Attachments, and To or CC. 

22. Search all mailboxes: Searching Mail in iOS 6 could be a drag, especially since you could only search the mailbox you were currently viewing. In iOS 7, it’s a bit easier: When you enter a search term, pull down on the search results, and you’ll reveal a toggle that lets you choose between searching only the current mailbox or all mailboxes.

23. Undo trash/moved/junked messages: We’ve all done it: accidentally deleted or moved a message we didn’t mean to. Yes, you could go all the way out of the account and then into the Trash and move it back to your inbox, but here’s a much faster way: Give your iOS device a shake and you should see an Undo dialog box pop up. Tap Undo to put your messages back where they belong.

24. Smarter mailboxes: While we still don’t have true, customizable Smart Mailboxes in iOS 7, there are a bunch of handy specialized mailboxes that you can add to your main Mail screen. Just tap Edit and scroll down to see a list of options, including your VIP mailbox, flagged messages, those that have attachments, and even one containing just those messages which have you in the To: or CC fields. Select any to show them (or deselect those ones you want hidden); you can also rearrange them by tapping and dragging them into the order you want. When you’re finished, just tap Done at the top of the screen.

Messages

25. Check the time: As you go through your conversation in the Messages app, you might spot the occasional timestamp between conversations. But sometimes you want to know exactly when a certain text appeared. Messages offers just this feature in iOS 7—all you have to do is swipe and hold left on a conversation to expose a set of timestamps for every text you and your friends have sent.

26. Send that text onward or banish it from existence: In prior versions of iOS, you could delete text messages from your phone or forward them on via the Edit button. In iOS 7, that button is gone; instead, to forward or delete a text, you must first tap and hold on it. Tap the More pop-up, and circles appear to the left of your messages, with the current one selected. It’s up to you whether you want to delete or forward a single text, or select multiple messages.

Miscellaneous

iOS 7's AirDrop feature is handy not only for sharing photos, but also websites, videos, map locations, and almost anything else you can share.

27. Send everything with AirDrop:One of the most powerful, if under-appreciated, features of iOS 7 is AirDrop. Most people think of it only as a way to send pictures, but in truth anything that you can text or email you can probably send via AirDrop. For example: Got a bunch of friends meeting at a location? Fire up Maps, search for your location, tap Share, and AirDrop it to everybody present at once. It doesn’t require a Wi-Fi network, or even that you know the other person’s contact info. Just make sure that the recipients have AirDrop set to Everyone or Contacts Only in Control Center.

28. Short names in Messages and Mail: Have too many Dans in your Messages app? You can make their names show up as “First initial, last name” thanks to iOS 7’s new Short Names feature. To enable it, go toSettings > Mail, Contacts, Calendars > Short Name and turn on the Short Name toggle on that screen. You can choose from the aforementioned First Initial & Last Name setting, or pick First Name & Last Initial, First Name Only, or Last Name Only. You can additionally opt for your device to Prefer Nicknames, if they’ve been set in a contact record.

29. Monitor what cellular data your apps use: It’s easier than you might think for your device to gulp up cellular data, especially when on speedy LTE networks. To avoid running up expensive overage charges, you can view how much data each app is using by going to Settings > Cellular and scrolling through the app list. Under each program’s name, you’ll find how much data it’s been using—to the right, there’s a toggle for disabling cellular data for that app.

Scroll all the way to the bottom and you can also check how much your system services (Personal Hotspot, Exchange Accounts, Messaging services, and the like) are using, along with a button to reset these numbers to zero and start counting all over again.

30. Disable Background App Refresh for certain apps: Is your battery lagging in iOS 7? You might be the victim of too many apps using the operating system’s Background App Refresh feature. For apps like your Mail client, it’s important to be able to grab new data even if that program isn’t running in the foreground; other apps like Facebook might not need such extravagances.

To disable Background App Refresh on an app-by-app basis, go to Settings > General > Background App Refresh. From there, you can turn off the feature altogether or individually disable just the offending apps.

31. Find the Compass’s hidden features: Not only is iOS 7’s Compass app a thing of beauty, it has some neat functions hidden away. One such function: compass headings. If you know you have to head 340° North, for instance, you can tap the screen once to set a compass heading; whenever you deviate from that path, a red bar appears along the side of the compass from your heading start point. To clear it, tap once more.

Swipe left, and you’ll find a second app inside Compass: a level. Though not as accurate as a traditional bubble-level, it’s still a useful tool in a pinch—and if you’re looking to distract yourself from playing Threes, try leveling your phone while you hold it in your hand like a game controller.

32. Customize Notification Center’s Today pane: Swipe down from the top of your device’s screen and you’ll visit Notification Center, iOS 7’s repository for your alerts. In addition to a list of your current notifications, this pane also offers a Today view, which provides you with the current date, a list of birthdays, the weather, calendar data, reminders, stocks, and a preview of your next day. You can choose which of those features actually appear by visiting Settings > Notification Center and toggling features in the Today section on or off.

33. Tips and tricks with Touch ID (iPhone 5s): If you have an iPhone 5s, you’re probably pretty familiar with the device’s fingerprint scanner. Here are a few ways to make it even better.

If you’re having trouble getting Touch ID to recognize your print, try scanning the same print multiple times, or deleting the original print and starting over. Because Touch ID is constantly attempting to refine your print, it can occasionally get confused and its data can degrade.

In addition, if you can’t remember which finger it was that you scanned in, visitSettings > Touch ID & Passcode and put your finger on the Touch ID reader; the appropriate print under the Fingerprints section should highlight in grey.

Source: Macworld.com

Share this post
Repost0
April 28 2014 1 28 /04 /April /2014 07:18

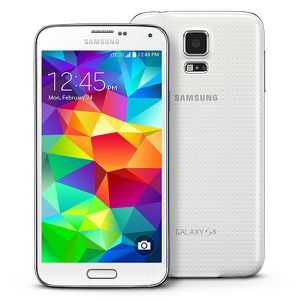
The long-expected smartphone –Samsung Galaxy S5 has been launched in this April. Why it is so popular that become a darling around the world? Let us take a look at what is the magic power of Samsung Galaxy S5!

samsung-galaxy-s5.jpg

  • Operating System: Android 4.4.2(Kit Kat)
  • Size & Weight:  Height:5.59 inches  Width: 2.85 inches Depth:0.31 inches Weight: 5.11 ounces Screen Size: 5.1”
  • CPU: Processor Speed/ Type: 2.5GHz Quad-Core Processor
  • Display: Main Display Resolution: 1920*1080 pixel  Main Display Size: 5.1 inches FHD Super AMOLED
  • CameraCamera Resolution: 16MP Front-Facing Camera Resolution: 2MP
  • Memory: Internal Memory:2GB RAM/16GB ROM;External Memory: up to 128GB
  • Wi-Fi:802.11a/b/g/n/ac 2.4G+5GHz,VHT80 MIMO

With above latest and strongest technology, Samsung Galaxy S5 provides varied world-leading smartphone functions to users, especially the entertainment on mobile telephones. But some people asked:”Can I transfer some movies on encrypted DVD discs to my Samsung Galaxy S5? ” The answer is Any DVD Cloner Platinum can transfer it.

Think about it, watching movies on your Samsung Galaxy S5 with the 5.1” super-big screen when you lie in bed, take a bath or any other time you are in leisure. What a wonderful time! This article will help you convert movies on DVD discs to your Samsung Galaxy S5 successfully.

Any DVD Cloner Platinum is a powerful combination of DVD cloner and DVD ripper. As a DVD cloner, it provides 4 flexible copying modes to copy, clone or compress DVD to DVD, DVD folder or ISO image with all protections decrypted and removed. As a DVD ripper, it can rip any DVD to MP4, M4V, AVI, M2TS, HTML5 embedded video, easy to convert encrypted DVDs to videos supported by popular devices like Samsung Galaxy S, iPod, iPhone, iPad mini, Xbox 360, Android devices, etc.


Only with 6 steps, you can enjoy the visual feast on your Samsung Galaxy S5 with Any DVD Cloner Platinum:

Step 1: Download  Any DVD Cloner Platinum and install it on your PC. Here is also the virsion for Mac usres.

Step 2:  Insert a DVD into DVD drive, launch the program, then click "Open DVD" to load DVD information in the program.

Step 3: Go to "DVD Ripper" panel, choose output format for Samsung Galaxy S5

Click "Normal" as output option, and you can choose "MP4" as output format that can be supported by Samsung Galaxy S5.

Note: You can click "More Settings " button to customize video and audio parameters.

platinum-video-audio-customized

Step 4: Click "Start" to start the ripping process.

Step 5: When the ripping is done, a folder saving the video file will popup automatically, that is the MP4 file generated by DVD to the smartphone;

Step 6: Transfer the file to Galaxy S5, then freely enjoy DVD movies anytime and anywhere without limitations!

Share this post
Repost0
April 22 2014 2 22 /04 /April /2014 11:06

Disney’ Bears : Movie lovers’ welfare- Disneynature's Bears has be released on April 18, 2014. From Disneynature, the studio that brought you Earth and Chimpanzee, comes Bears—an epic story of breathtaking scale. Showcasing a year of in the life of a bear family, mother Sky teaches her two impressionable cubs, Amber and Scout about most important lessons of life. Astonishing footage captures  the fast-moving action and suspense of an endearing family learning to live life to its fullest in one of the planet’s last great wildernesses.

Disneynature-Bears-2

What puzzled movie lovers most is the DRM protection of M4V movies bought or rented from iTunes. You can only watch the M4V movies on iTunes. Moreover, there is a validity of period for M4V movies so that you can not keep always keep them or share with your friends.

Tune4Mac iTunes Video Converter Platinum will be a great help for your problem. Tune4mac iTunes Video Converter Platinum is a professional M4V conversion program designed for Mac OS users. The most important function of Tune4mac iTunes Video Converter Platinum is that it can remove DRM protection of both purchased and rental movies with exellent output quality and high conversion speed.

Step-by-step tutorial on how to remove DRM protection of M4V movies rented or bought from iTunes:

 Step1. Download and install Tune4mac iTunes Video Converter Platinum

 Step 2. Install Tune4mac iTunes Video Converter Platinum on your Mac and launch it by double  clicking the iTunes Video Converter Platinum icon

 Step 3. Add M4V movies to Tune4mac iTunes Video Converter Platinum

 Click the "Add Movies" button in the top-left to add the video files Disneynature's Bears. The software will open  the iTunes movies library by default. Select the files and then click "OK".

 1

 Step 4. Set output path and output format

 Click Tune4mac iTunes Video Converter Platinum > Preferences, you can customize the output path as you like  in the popup box. 

 Step 5. Click "Profile Setting" button, you can customize different output format for each target video.

 Step 6. Click "Convert" button to start to convert M4V videos with Tune4mac iTunes Video Converter  Platinum

Just five simple steps, you can finish to remove DRM protection from iTunes M4V videos, then play Disneynature's Bears on Mac OS X or share the iTunes M4V movies with your friends or families through internet freely. So why don't you download this Mac iTunes Video Converter Platinum for a try now?


Share this post
Repost0
April 18 2014 5 18 /04 /April /2014 07:35

What's the best phone? Our verdict on the best smartphones - constantly updated

Sometimes choosing between two cell phones is easy. Just look at the specs and it becomes woefully clear that some phones (even those positioned directly against one another) aren't created equal.

But most of the time it's not as easy as just reading numbers. A phone is something you'll use everyday for two years (if you're lucky). It needs to be durable, adequately future-proof and feel right in your hand.


5. Samsung Galaxy Note 3


Note3-Press-02-580-90.jpg  


The Samsung Galaxy Note 3 is quite similar to its predecessors, the Galaxy Note and Galaxy Note 2; you're going to get something that looks like a giant phone and a small tablet meaning it's definitely not a device a lot of people will be clamoring for - but that doesn't mean it's a bad phone - in fact, it's a really great phablet.

The Galaxy Note 3 has grown again since the 5.5-inch offering on the Note 2 to a palm busting 5.7 inches complete with a full HD, 1080 x 1920 Super AMOLED display.

The Note 3 has also retained the metal frame from the Galaxy S4, which runs around the edge of the device providing a rigid body and a more premium look. The leathery texture adds to the idea of high quality, though it could look a bit tacky to some. But it actually does give the phone a nice grip and solid feel.


4. Nexus 5

Nexus5-Press-01-580-100


The Nexus 5 and Moto X are so close that it's really more like an equal second place here, and the difference between the two is going to come down to personal preference.

It has a large, sharp display and excellent battery life with its 2,300 mAh unit. If there is anything lacking, it would be the camera, but since Google's latest update to it, it turned out to be a good enough shooter.

What really makes the Nexus 5 incredible is the top-tier hardware - 2.3GHz Snapdragon 800, 5-inch 1920 x 1080 display, 2,300 mAh battery, 8MP camera - all at a starting price of just $349 unlocked. You won't find anything in that pricing realm with these specs these days, which makes the Nexus 5 an even more killer deal.

Moreover, you're running Android 4.4. KitKat, the latest version of Android, and you'll be getting Google's updates as swiftly as they come.


3. iPhone 5S

iPhone5s-front-580-90.jpg


The iPhone 5S is a phone that takes everything Apple has learned over the last six and a half years and put it together in an incredibly cohesive manner.

There's always an apathy with any kind of "S" device from Apple, as it's historically just the same thing made a little bit better, and it's true the advances on the iPhone 5S are few - but the ones that are there are very impressive indeed.

Below the surface, Apple has put together one of the most cutting-edge smartphones around, imbued with a top-end camera and a really innovative feature with Touch ID.

There's only so much that smartphone manufacturers can do to differentiate these days, and while Apple can't expect consumers to be wowed by the same shell, it can expect to get some interest in the sharp camera and gives a sense of relief with the new A7 chip.

Its performance is consistent, battery life is good and the camera is one of the best - if not the best all around - in the market.


2. Samsung Galaxy S5

GS5Wht 600x600 xlarge Grp 1


The Galaxy S5 pushes that flagship Galaxy S line into the future, and with it, Samsung has listened to critics and decided to scale back on all the junk they stuff into the UI. The camera is good as ever, its processor more powerful and its design rich with plastic, as usual.

We love that it's one of the few smartphones that still allows swappable batteries and memory cards, which is huge in an age when 32GB isn't enough, and battery technology hasn't quite caught up with our needs and demands.

The large, high-res display is beautiful, and it's covered with strong, scratch-resistant Gorilla Glass. If you're in the market for an Android handset, this is pretty much amongst the top-tier devices for 2014. You really can't go wrong with it if you don't mind the plastic build.


1. HTC One (M8)


OneM8-Press-02-580-90


The HTC One (M8) is probably going to remain our number one pick for the year. HTC managed to keep many of the beautiful design elements of the 2013, or M7, model. along with refinements to Sense UI that make the experience feel fresh.

Perhaps it's biggest shortcoming is its low-resolution camera, but we've already given our opinion on that: what you do with the camera is more important than the actual camera itself. One neat camera trick is that you can now choose your focus point after shooting a photo, thanks to that secondary camera.

The 2014 version, or M8 model, has a slightly larger display than its predecessor at 5 inches over 4.7 inches. With the same resolution, that brings the overall PPI count down, but even the most discerning eyes wouldn't be able to tell the difference.

Moreover, the HTC One's processor gets a bump with the new Snapdragon 801. Overall performance on the device is excellent. Coupled with its design, UI and overall build quality, you can't get better bang for your buck in the Android space. The HTC One is the easy winner this year.


Source:

http://www.techradar.com/us/news/phone-and-communications/mobile-phones/20-best-mobile-phones-in-the-world-today-645440

Share this post
Repost0